My sweet friend is having a baby next week. Me and another friend Kate, threw her a baby shower and it just happened to fall on St. Patrick's Day. We thought it was meant to be because she is naming her baby Killian which is an Irish name. So we ran with it. Here is what we created!
The favors we made had an Irish saying along with some treats. I printed them with my sketch pens on the silhouette and then cut it out. I love that you can sketch things on the silhouette and leave the mat in it and then have it cut it.
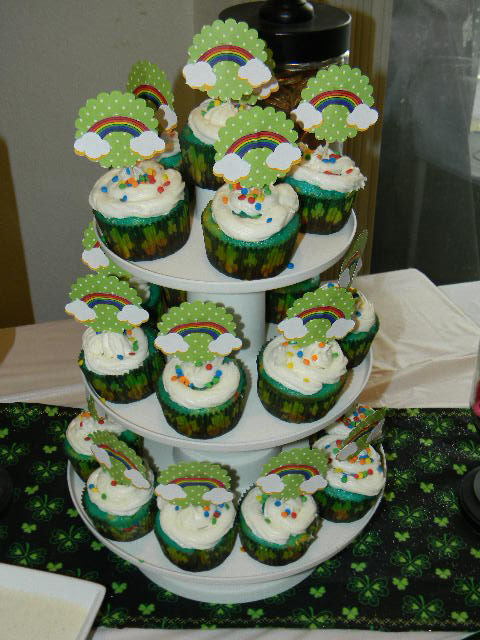
Kate spent a lot of time making these cupcakes. She split the batter up and colored them all. Then she layered them in the cupcake wrappers. I made the toppers. I again used my silhouette to cut them out. They took a little more time then I thought they would because I had to use the sketch pens for the rainbow first, then cut it out, then cut the clouds, banner and yellow background cloud, separately. Then I had to color the rainbow, glue it to the banner, then glue the white cloud to the yellow cloud, then glue them both to the rainbow.
It was a lot of work and I was sad to see them all thrown away after the party. I guess in hindsight, I could have just taken them off the used toothpicks and kept them for another party. Oh well, too late now.
I found this super cute idea on pinterest. It was pretty simple. I've had a lot of leftover clothes pins from another project and decided to use them up. Really, my silhouette did all the work. All I did was glue them to the clothes pin and roll them up.
The water bottles, I love. Again my silhouette did the work, I just had to assemble.
Here is the finished project.
We had a rainbow fruit platter with fruit dip clouds. Yummy veggies, cupcakes, spinach/artichoke dip with bread. It was delicious. My mother in law made me the apothecary jars and I love them. I filled them with lucky gold coins, skittles so we could taste the rainbow;-) and rainbow colored gumballs.
I made this cool subway art for it and sewed a little table runner out of festive fabric. The lucky banner took me forever to make. After all the cutting my silhouette has done, the blade is getting pretty dull, so I had to trim, cut and just help it along a bit. When all is said and done, it was a hit! I love how everything turned out!


 I wanted to do Let Freedom Ring and luckily I found the liberty bell shape to go with it. I cut out the vinyl on my silhouette and voila!
 I've had this 6 foot 2x12 piece of wood in my sewing room for a long time and decided to start putting it to use. Daniel cut out some blocks out for me and I trimmed them to the length I wanted with my scroll saw and sanded them up. I think I need to get a 1" belt sander to get the effects I want, but it'll have to wait for another day.
I LOVE my silhouette SO much! I would never be able to write anything and have it look this good. So, as a solution, I typed up what I wanted in my silhouette studio and cut it out in vinyl and used that as a stencil to paint over. I think it turned out great.
I've had this 6 foot 2x12 piece of wood in my sewing room for a long time and decided to start putting it to use. Daniel cut out some blocks out for me and I trimmed them to the length I wanted with my scroll saw and sanded them up. I think I need to get a 1" belt sander to get the effects I want, but it'll have to wait for another day.
I LOVE my silhouette SO much! I would never be able to write anything and have it look this good. So, as a solution, I typed up what I wanted in my silhouette studio and cut it out in vinyl and used that as a stencil to paint over. I think it turned out great.
 I also love the glaze effects from General Finishes. I use this Van Dyke Brown on EVERYTHING! It antiques it and makes it look amazing. I've had this jar forever and it's just now starting to run out.
 Happy 4th of July!!

 I couldn't decide on what phrase I wanted to use. I thought maybe, "I Pledge Allegiance . . . to the Flag." Or "One Nation . . . Under God." But finally settled on this one. I'm kind of loving it.
If anyone wants one, let me know! I'll sell you one!
I couldn't decide on what phrase I wanted to use. I thought maybe, "I Pledge Allegiance . . . to the Flag." Or "One Nation . . . Under God." But finally settled on this one. I'm kind of loving it.
If anyone wants one, let me know! I'll sell you one!
 The tutorial has you wrap the wreath with jute, but that just seemed a little too labor intensive for me. I decided to use burlap instead, and it worked out pretty well. One thing I'm not loving is how it doesn't seem to have a lot of contrast. I think I needed to paint the letters a blue or something. I guess there's still time to do it!
You can see the tutorial here
Enjoy!
The tutorial has you wrap the wreath with jute, but that just seemed a little too labor intensive for me. I decided to use burlap instead, and it worked out pretty well. One thing I'm not loving is how it doesn't seem to have a lot of contrast. I think I needed to paint the letters a blue or something. I guess there's still time to do it!
You can see the tutorial here
Enjoy!
 The pattern didn't have a lining for the skirt and we wanted all the dresses to have a little pink petty-skirt (is that how you spell that?). So I essentially made a second skirt out of the lining and attached the pink tulle.
 I also made my 2 niece's dresses for the wedding. They all turned out pretty cute. Caitlin's turned out a little shorter then I thought it would, but looking at the pattern again, I think it was meant to be kind of a baby-doll dress. Luckily I added lining to that dress too, so I could extend the length a little with the pink tulle. I love how Whitney's turned out too. She's the oldest granddaughter so I wanted her to look a little older, so Christina and I picked out this pattern. I made an extra flower for her dress too.
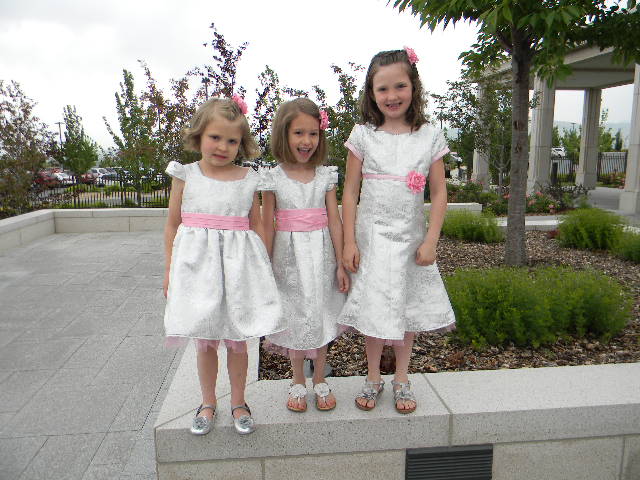 The wedding colors were bubblegum pink and silver and black I think, so they all looked adorable in the dresses. Luckily my sister in law Melissa, can sew too and made her daughters dress and the bow ties for all the boys. Everyone complimented them all on how cute they all looked together. It was fun because I'm starting to feel more comfortable altering patterns to what I want.
 My little model, isn't she so cute?!
 You cut 6 circles in the shiny-vinyl-ish fabric, each getting progressively smaller. And make 5 cuts halfway in around the side.
 The tutorial says to use a tea light for the next part, but it was so small it didn't work well for me. So I grabbed a regular candle. You hold the fabric about 2 inches above the flame, and watch it curl! At first I tried it with a lighter, just on the edges and it didn't work very well. So it's important you actually hold it 2 inches above the flame. Then you stack the flower petals. You can glue each one on to the other if you want. I just stacked them and sewed on the pearly beads for the flower center to hold them together.
 Then I just hot glued them onto a barrette and voila! A flower! They looked so cute on all the girls!